
Water is essential in our lives. Sometimes, we fail to shut off the motor, and the tank fills up, and it overflows. This can cause a waste of electricity and water. This is why a Water Level Indicator Project is an excellent idea for students at school. It’s simple, enjoyable, and can be very beneficial in everyday life.
In this blog written by Techradiance, you will be able to learn all the information in a very simple language. Even a fifth-grade student can comprehend and create this project step-by-step.
Author: Himanshu, a Content writer
What is a Water Level Indicator Project?
A water level indicator is an electronic device that indicates the amount of water in tanks. It makes use of tiny sensors to monitor the water level and provides an indication when it is filled or empty.
This project is very beneficial because:
- Water conservation
- Saves electricity
- Stops overflow
- It makes our lives simpler
Why Should Students Make This Project?
A Water Level Indicator Project is a fantastic exercise for children to learn. It helps them comprehend the basics of electronics in a concrete way.
Benefits for Students:
- Learn about the basic circuits
- Enhance problem-solving abilities
- Learn about real-life applications
- Enhance creativity and confidence
How Does a Water Level Indicator Work?
The operation of this project is quite easy.
Water conducts electricity. When water comes into contact with sensor wires that complete the circuit. This activates an LED or buzzer that displays the water’s level.
Simple Working Steps:
- Sensors are located at various levels within the tank.
- If water comes in contact with the sensor, it flows with the current
- LED lights light up to indicate the amount
- The tank will sound a buzzer when it is filled
Components Required for Water Level Indicator Circuit
For a straightforward Water Level Indicator Circuit ,You will need the following:
- Battery (9V)
- Breadboard
- LEDs (3-5)
- Resistors
- Transistors (optional)
- Buzzer
- Connecting wires
- Water tank (or container)
They are readily accessible and affordable.
Water Level Indicator Circuit Diagram Explained
Knowing the Water Level Indicator circuit Diagram is vitally important.
Basic Idea:
- Each LED displays an individual level of water
- If water comes in contact with a wire, it turns the LED on.
- The top LED displays “Tank Full.”
Simple Explanation:
- The bottom wire is the lowest level
- Middle wire – Medium level
- Top wire – Full level
That’s how the Water Level Indicator Diagram aids us in understanding the system in a simple way.
Step-by-Step Guide to Make the Project
Step 1: Setup the Circuit
Connect resistors and LEDs to the breadboard.
Step 2: Connect Sensor Wires
Set wires at different levels within the tank.
Step 3: Connect Power Supply
Connect the battery to the circuit’s power source.
Step 4: Test the Project
Slowly fill the water with water, and you will see the LEDs light up one after another.
Step 5: Add Buzzer (Optional)
Connect a buzzer with the highest level to trigger an alert.
Your Water Level Controller Project is complete!
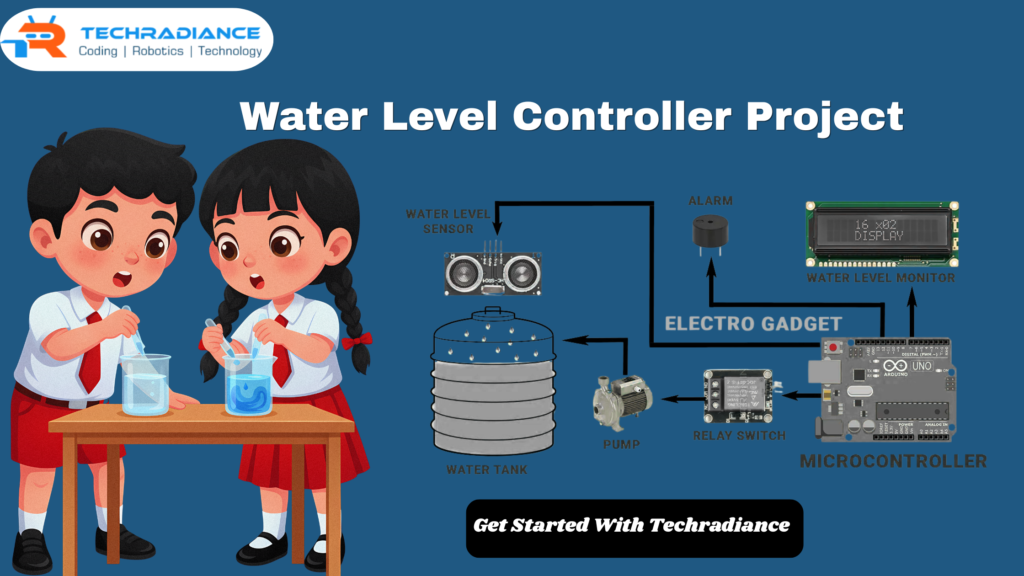
Advanced Idea: Water Level Sensor Arduino Project
If you’re looking to build an intelligent project, you can make use of the Arduino Water Level Sensor Arduino .
What is Arduino?
Arduino is a tiny computer board that is used to create smart electronic projects.
Features:
- Digital display of water levels
- Motor control with automatic ON/OFF
- More precise results
This is a fantastic upgrade for the higher grades.
What is a Wireless Water Level Indicator?
A Wireless Water Level indicator transmits signals without wires. It utilises wireless technology to display the water level from a distance.
Advantages:
- No long wires needed
- Can you monitor from a distance?
- Modern and more advanced
Real-Life Uses of Water Level Indicator
This project is not only intended for schools. It can be used in real life too.
Uses:
- Homes (water tanks)
- Schools
- Buildings
- Farms
- Industries
It aids in preserving water all over the world.
Benefits of Water Level Indicator Project
1. Saves Water
Stops waste and overflow.
2. Saves Electricity
The motor is shut off at the proper time.
3. Easy to Make
Simple design for beginners.
4. Low Cost
Affordable components.
5. Practical Learning
The best example of real-world science.
Tips for Students
- Always seek advice from a parent or teacher
- Double-check connections
- Make sure you use high-quality components
- Make sure the circuit is dry and secure
Final Thoughts:
The Water Level Indicator Project is among the most effective projects for students in schools. It’s easy, beneficial, and enjoyable to create. Students will learn about basic electronic concepts and understand the role technology plays in conserving water.
Techradiance is a place where we always teach students through doing. Explore this project to discover the universe of science and creativity!
⭐ What Students Say About This Project (Testimonials)
1. Riya Sharma (Class 6)
“I created this project to measure the level of water for an exhibition at school and it was a success! The steps were easy to follow. Thank you Techradiance!”
2. Aarav Verma (Class 7)
“This is the most satisfying project I’ve ever worked on. The circuit for indicating water level diagram was easy to understand and I was able to understand everything quickly.”
3. Priya Singh (Class 5)
“I was afraid of electronic devices before however this project has helped me to learn in a fun manner. Now I am able to explain how the indicator for water level functions!”
4. Rahul Kumar (Class 8)
“I took the Arduino design from this blog to create an intelligent indicators for water levels. My teacher was extremely impressed by my work.”
Frequently Asked Questions ( FAQ’S)
1. What is a water level indicator project?
The water level indicator is a simple system that displays the water level in a tank using LEDs or a buzzer.
2. How does a water level indicator circuit work?
A circuit for indicating water levels is activated when water comes in contact with sensor wires. It then completes the circuit by turning on the LEDs.
3. Why is a water level indicator important?
It saves water and electric power by preventing the overflow of water and regulating the motor.
4. Can students make this project easily?
Students can complete this project with only a few components and a few basic steps.